Write Newsletters That Sound Like You in Minutes
Most AI writing tools produce generic copy. Set up a brand voice profile in Flyletter and run a multi-agent pipeline that writes newsletters in your voice.

7 min read

Most people fire up an AI writing tool, type a prompt, and wonder why the output reads like it was written by a corporate robot with no personality.
As a writer, founder, and AI vibe coder, I've been there. And after building Flyletter and testing every approach to AI-generated content, I figured out why it happens.
It's actually two problems, not one.
Problem one: the AI doesn't understand the essence of your brand. No voice profile, no writing samples, no guidance on tone or formatting. You're basically handing a stranger a microphone and saying "talk like me."
Problem two: the AI did know your voice, but one model can't do the job of an entire content team. Strategy, research, outline, writing, editing, visuals. That's six different skill sets. Asking one AI to handle all of them is like asking your designer to also do your accounting. Something's gonna suffer.
So writing a newsletter that actually sounds like you in minutes takes two things: a detailed brand voice profile that teaches the AI exactly how you write, and a multi-agent pipeline where specialized agents each handle one part of the process, all informed by your profile.
I'm going to walk you through how to do this all in Flyletter in just five steps. It only takes minutes, not hours, and once it's set up, you'll have an entire content team that writes like you.
Let's get it:
Step 1: Establish your brand identity

Give your brand a name and tell Flyletter what type it represents. You can think of your brand name as the pseudonym you write your newsletter under. If it's a personal newsletter, you can name it yourself, if you write as a company persona you can name it after your business, and if you're a person representing another brand, you can name it either.
For what type of brand is this, select:
- Personal brand: Represents your individual voice and expertise
- Business brand: Represents a company or organization
- Hybrid: A personal voice representing a business brand
Once selected, you're ready for step two.
For a deep dive into Flyletter's brand profile setup and optimization, check out our article on creating a brand profile that sounds like you.
Step 2: Feed it your writing samples
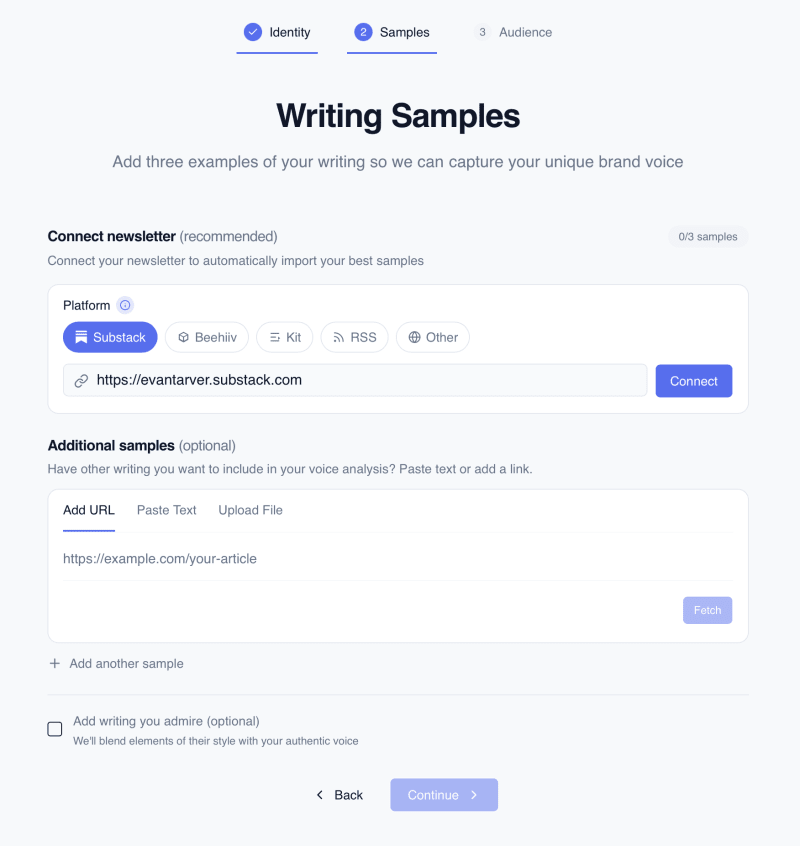
Flyletter analyzes your actual writing to learn your voice patterns. Not just what you write about, but how you write. Your sentence length. Your paragraph rhythm. Whether you use fragments (like I do). Whether you bold key insights. Whether you're the type to drop a casual "btw" mid-sentence or keep things buttoned up.
You can input content a few different ways:
- Connect your newsletter: If you have a public URL (like Substack, Beehiiv, or Kit allows), active newsletter RSS feed, or post to a Wordpress blog (or similar), you can connect your newsletter directly by pasting the URL.
- Add samples manually: If you don't have a public URL or want to add additional samples, you can add writing samples individually.
- Writers you admire: If there are any writers you admire and want to emulate, you can also add them to blend elements of their style with your authentic brand voice.
Flyletter only requires three samples for a complete brand profile, but you can add more if you choose. Try to limit your samples to five, however.
Step 3: Define your audience
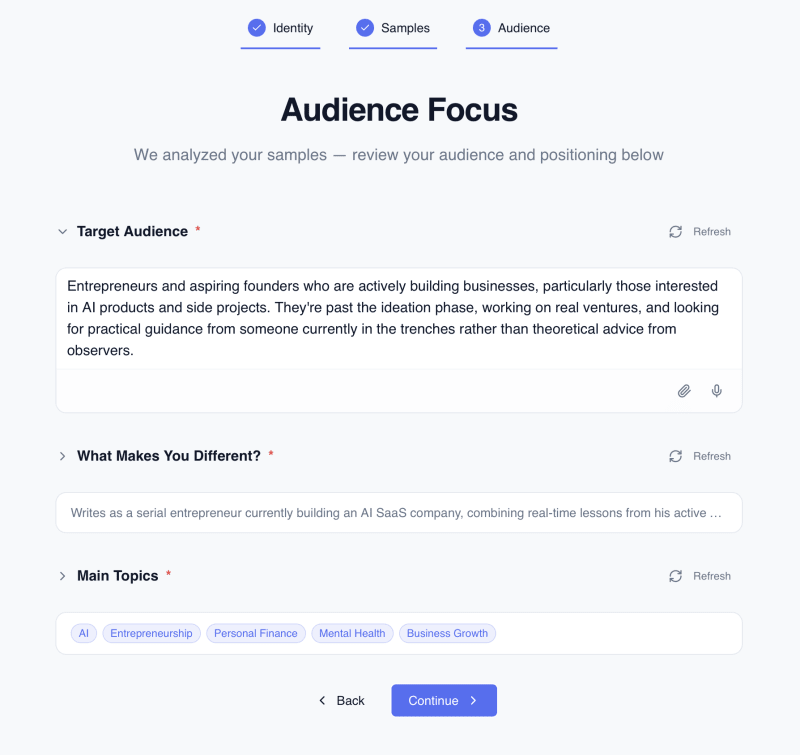
The final step rounds out your brand profile, and are important pieces of information to confirm:
- Target audience: Who do you write your newsletter for?
- Unique differentiator: What makes your brand different?
- Main topics: What do you write about?
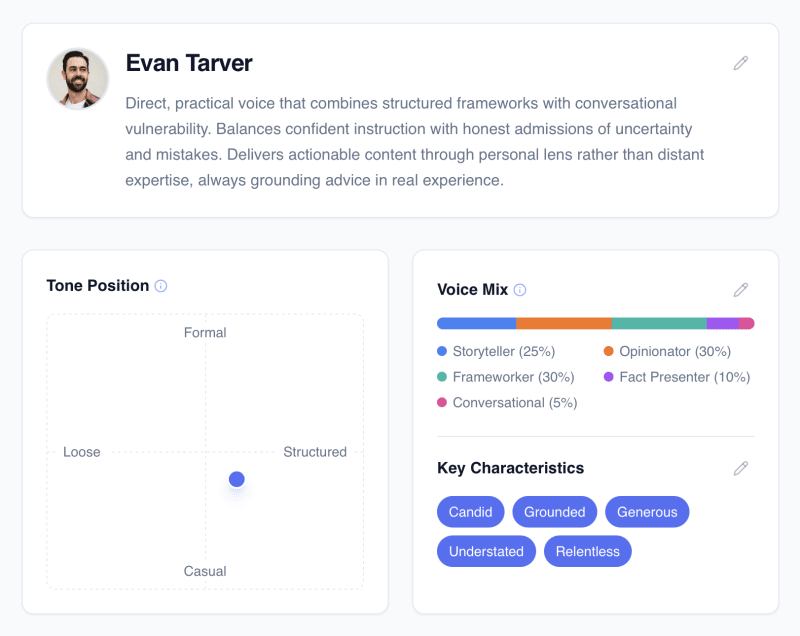
Once you complete all three steps, your brand profile is created. Every piece of content you write in Flyletter from this point forward runs through that profile.
Step 4: Choose a topic and let Flyletter work
With your brand profile complete, now it's time to actually write something. You can do so in a number of ways:
- Suggested topic: Flyletter suggests trending and evergreen topics based on your brand persona.
- Saved idea: Save ideas as you have them, develop them with the Thought Partner, and write when you're ready.
- Repurpose content: Have YouTube videos, blog posts, podcast transcripts, and more? Have Flyletter turn that content into a publish-ready newsletter draft.
- Data dump: Write or dictate to Flyletter directly in the dashboard.
Once you hit go, you literally have an entire content team in a box.
Instead of one AI doing everything (and doing most of it poorly), Flyletter breaks the process into specialized agents that run in sequence:
- Strategy agent takes your input and builds a content strategy around it
- Research agent goes out and finds relevant data and sources based on that strategy
- Outline agent creates your newsletter skeleton
- Writing agent drafts the full piece in your voice
- Polish agent edits to make sure it's on-brand and publish-ready
- Image agent generates your featured image based on the final draft
Every single agent is informed by your brand profile. So the strategy agent doesn't just pick any angle, it picks one that fits your perspective. The writing agent doesn't just write well, it writes like you.
And you're not locked in while it works. You can leave the studio, do other stuff in the app, and come back when it's done. The newsletter pipeline keeps running in the background.
Step 5: Review and refine
Once the newsletter is complete, you can edit anything manually in the editor or chat with the Refine Agent to make changes. Want to add a fifth section? Just ask. Want to tweak the tone? Say so. The AI makes the edit on the spot.

When you're happy with the final draft, publish it. If you're on Substack, copy the contents to your clipboard and paste directly into your editor. If you're on Beehiiv or Kit, you can export a draft straight into your platform and publish from there.
Ship it and keep improving
Once you start shipping, something cool happens over time: Flyletter learns. As you publish more newsletters, refine more drafts, and add more writing samples, Flyletter gets sharper at matching your voice.
Think of it like training a new team member. The first week they're good. By month three, they're finishing your sentences.
The whole process, from brand profile to published newsletter, takes minutes. Not hours. Not days of staring at a blank page wondering what to write about.
And consistent publishing in your voice is stage one of a four-stage framework for newsletters that grow.